
Amazon Brand Registry gives brand owners more control over how their products and intellectual property are represented on Amazon. It can also unlock tools such as A+ Content, Amazon Vine, additional brand-protection features, and certain benefits for qualifying new sellers.
The application itself is not especially long, but it is extremely particular.
Small discrepancies can cause a rejection. The capitalization of your brand name, the trademark record you select, the photos you upload, and even the Amazon login you use can affect the outcome.
I’ve completed this application dozens—if not hundreds—of times while helping product brands sell on Amazon. Here is how to go through each section, what Amazon is looking for, and the mistakes that commonly slow the process down.
Brand Registry Is Not the Same as Brand Name Approval
Before starting, make sure you are applying for the right program.
Amazon Brand Registry and Amazon brand name approval are two different things.
Brand name approval is the smaller and simpler process. It allows you to create listings for products using a particular brand name, including products that have never been listed on Amazon before. It generally requires photos showing that the brand name is physically attached to the product or packaging.
Brand Registry goes much further. It connects a verified trademark owner to a brand on Amazon and provides additional protection and selling tools.
Depending on your account and eligibility, Brand Registry benefits may include:
- More control over branded listings
- A+ Content
- Amazon Vine
- Brand-protection and infringement-reporting tools
- Brand analytics and other reporting
- The ability to extend Brand Registry benefits to connected seller accounts
- Certain incentives offered to qualifying new sellers
Getting brand name approval does not automatically mean the brand is enrolled in Brand Registry. For a more detailed explanation of the difference, read How Amazon Brand Registry Works and What It Doesn’t Do.
Brand Registry vs. Brand Name Approval
| Feature | Brand Name Approval | Amazon Brand Registry |
|---|---|---|
| Primary purpose | Lets you create listings using a specific brand name | Connects a verified trademark owner to a brand on Amazon |
| Trademark required | Usually no | Yes |
| Product photos required | Usually yes | Yes |
| Lets you create branded listings | Yes | Yes |
| A+ Content and advanced brand tools | No | Generally yes |
| Brand-protection tools | Limited | Yes |
What You Need Before Starting
You should prepare the following before opening the application:
- Your trademark information
- Your trademark serial or registration number
- A brand logo that displays the trademarked wording
- Real photos of the branded product or packaging
- Access to the email associated with the relevant Amazon seller account
- Contact with the attorney or representative listed on the trademark record
- Your business, manufacturing, and distribution information
Amazon sometimes asks for additional supporting documents. Depending on the application, those could include:
- A supplier or manufacturer invoice
- A trademark filing receipt
- A trademark registration certificate
- A manufacturing agreement
- Invoices for raw materials if you manufacture the product yourself
Not every applicant will see every request. It is still better to understand these requirements before submitting than to scramble for documents after Amazon asks for them.
Step 1: Use the Correct Amazon Login
Go to Amazon’s Brand Registry platform and sign in.
Whenever possible, use the same email address that serves as the owner or administrator login for your Amazon seller account.
Brand Registry and Seller Central are separate platforms. Using the same login makes it easier for Amazon to identify your selling account and connect the Brand Registry benefits after approval.
You may still be able to complete the process with a different login, but you could need additional steps later to connect the seller account manually.
After signing in and completing two-step verification, select Enroll a brand.
The enrollment page will explain that you need a pending or registered trademark. Select the option to begin enrolling your brand.
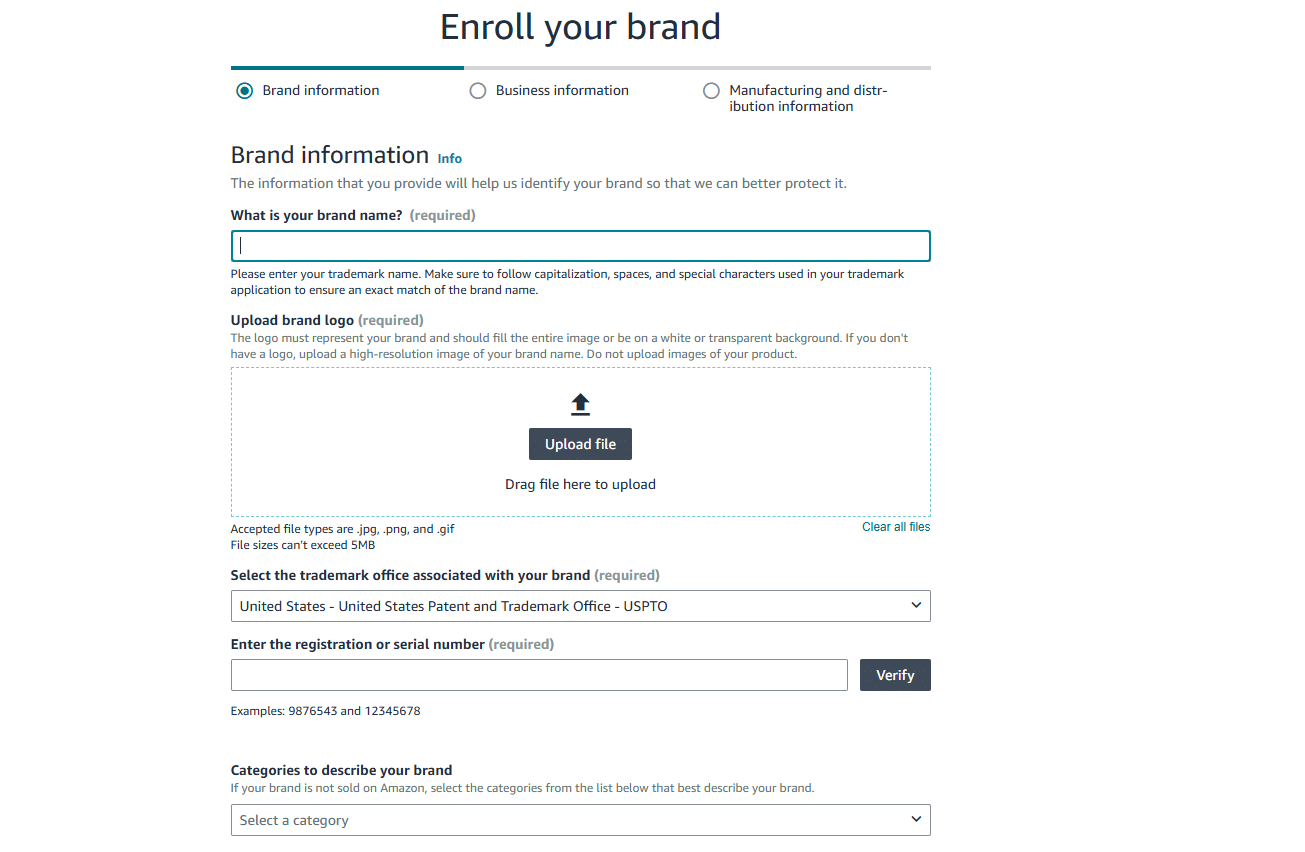
Image above: Select “Enroll your brand” if you have a pending or registered trademark. The IP Accelerator option is for brands that still need to begin the trademark process.
Step 2: Check the Official Trademark Record Before Typing Anything
Do not type the brand name from memory.
Open the official trademark database for the country where the trademark was filed. For a United States trademark, use the United States Patent and Trademark Office trademark search.
Search for the trademarked wording and make sure you select the record that belongs to your business.
Many trademark searches return several similar names. Two marks may look nearly identical while being owned by completely different companies.
Confirm the following:
- The trademark wording
- The owner
- The current status
- The serial number
- The registration number, if one has been issued
- The registration type
- The attorney or representative information
Keep the trademark record open in another browser tab. You will need to refer back to it during the application and possibly again during verification.
Step 3: Make Sure the Trademark Is Eligible
For a United States trademark, you generally need a usable serial number from an active application or a registration number from an issued trademark.
You do not necessarily have to wait for the entire trademark-registration process to finish before applying for Brand Registry. A pending application may be far enough along once the serial number is available and Amazon can verify it through the trademark office.
One detail that matters is the trademark register.
For a United States application, confirm that the record is on the Principal Register, not the Supplemental Register. A mark on the Supplemental Register may not meet the same Brand Registry eligibility requirements.
Do not assume that every trademark filing automatically qualifies.
Step 4: Enter the Brand Name Exactly as It Appears
This is one of the most important parts of the application.
The brand name entered into Brand Registry should match the trademark record exactly, including:
- Capitalization
- Spacing
- Punctuation
- Special characters
- Singular or plural wording
- Abbreviations
For example, if the trademark record displays FIVE STAR COMMERCE, do not enter Five Star Commerce.
Even though a person would recognize those as the same name, Amazon’s verification system may treat the capitalization difference as a discrepancy.
If the record capitalizes only the first letter of each word, use that exact format. If it uses all capital letters, enter all capital letters.
A minor difference can cause an otherwise valid application to be rejected.
Examples of Exact and Incorrect Matches
| Trademark Record | Brand Registry Entry | Likely Result |
|---|---|---|
| FIVE STAR COMMERCE | FIVE STAR COMMERCE | Correct match |
| FIVE STAR COMMERCE | Five Star Commerce | Possible rejection due to capitalization mismatch |
| Five-Star Commerce | Five Star Commerce | Possible rejection due to punctuation mismatch |
| Five Star Commerce | Five Star Commerces | Likely rejection due to wording mismatch |
| FIVE STAR COMMERCE | FIVE STAR COMMERCE LLC | Likely rejection because extra wording was added |
The safest approach is to copy the trademark wording directly from the official record rather than typing it from memory.
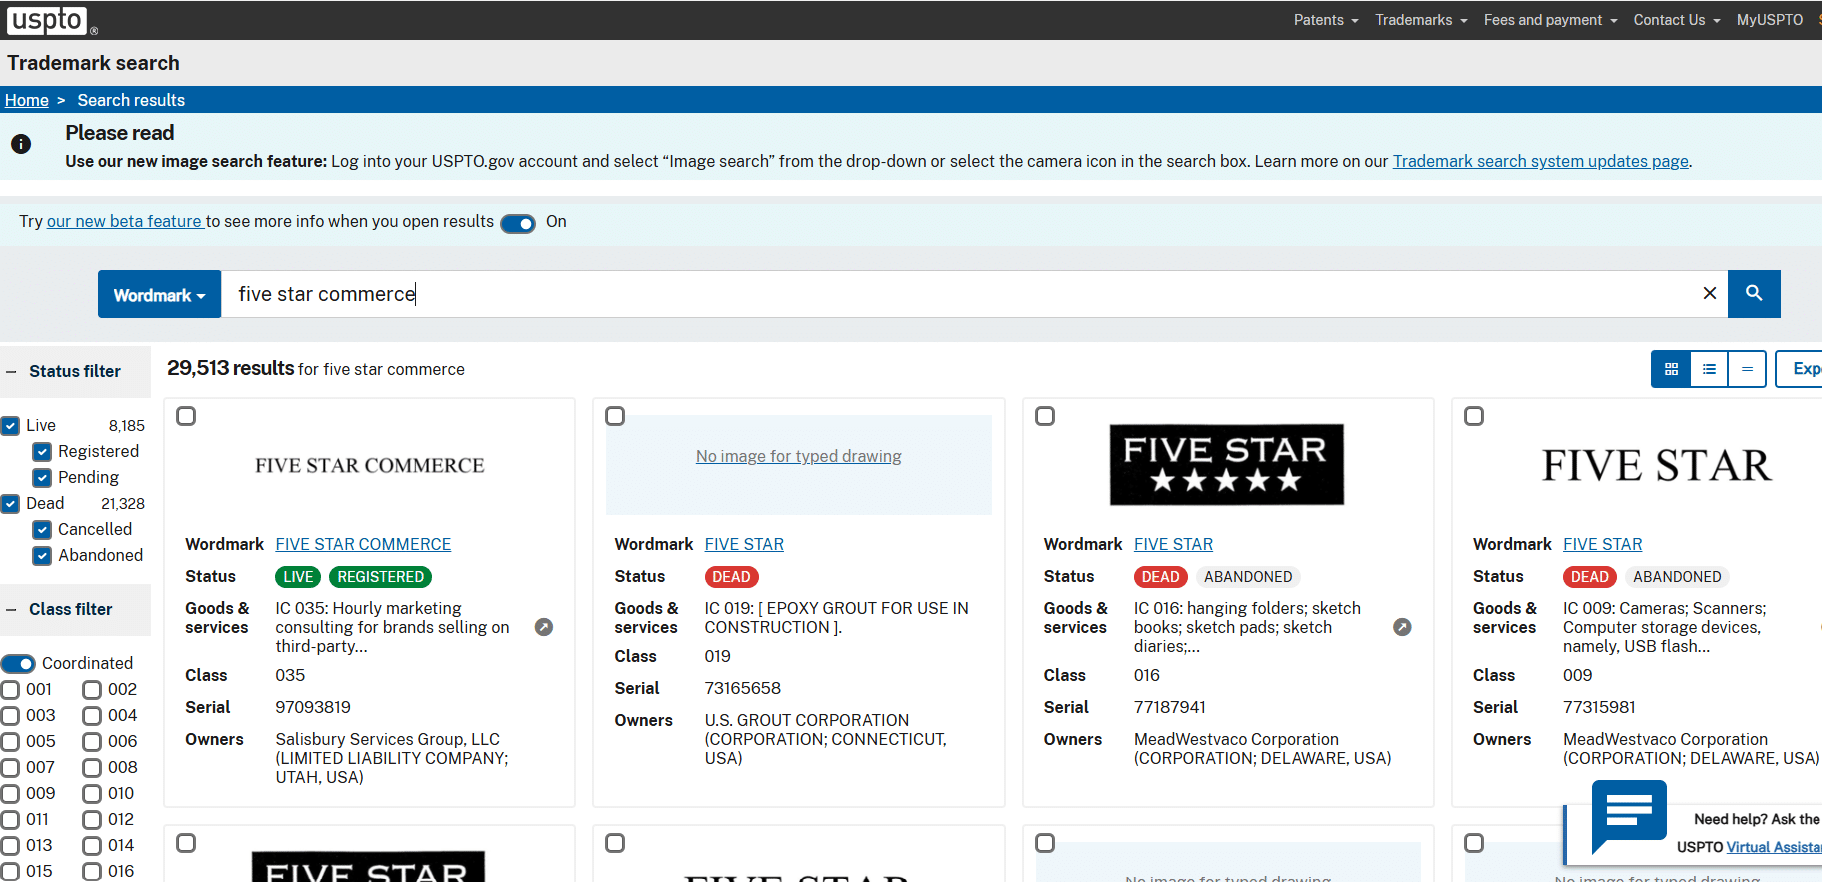
Image above: Trademark searches often return several similar results. Confirm the owner, status, goods and services, and serial number before selecting a trademark record.
Step 5: Upload the Correct Brand Logo
Amazon asks for a brand logo during enrollment.
The logo should clearly include the trademarked term. The wording on the logo should match the trademark you are enrolling.
Do not upload a symbol-only version of the logo if the trademark is for a wordmark and the symbol does not show the trademarked wording.
Use a clear, high-resolution file. The logo should fill the image appropriately and appear on a white or transparent background.
Do not upload a product photo in the logo field. Amazon asks for product photos separately.
Step 6: Select the Trademark Office
Choose the trademark office where the application was filed.
For a United States trademark, select the United States Patent and Trademark Office.
Amazon supports trademark offices in multiple countries, so an international brand should select the office that holds the actual trademark record being used for enrollment.
Do not select the country where you sell simply because it is your primary Amazon marketplace. Select the office associated with the trademark itself.
Step 7: Enter the Serial or Registration Number
The application allows you to enter either a trademark serial number or registration number.
A recently filed trademark may only have a serial number. That can be acceptable.
A trademark that has completed the registration process will generally also have a registration number.
Copy the number directly from the official trademark record. Do not add spaces, leave out digits, or rely on a document name that may show a different reference number.
After entering the number, click Verify.
Amazon may display a notice explaining that information will be shared with—or verified through—the contact associated with the trademark. This is connected to the verification-code step that happens later.
Step 8: Select Your Product Categories
Amazon asks which categories describe the brand.
Choose the categories that most closely match the products you sell or plan to sell.
This question is closer to business information than a permanent restriction. Selecting apparel, for example, does not necessarily mean you can never sell the brand in another category.
Answer it accurately, but do not overthink it as though you are permanently locking the trademark to one Amazon category.
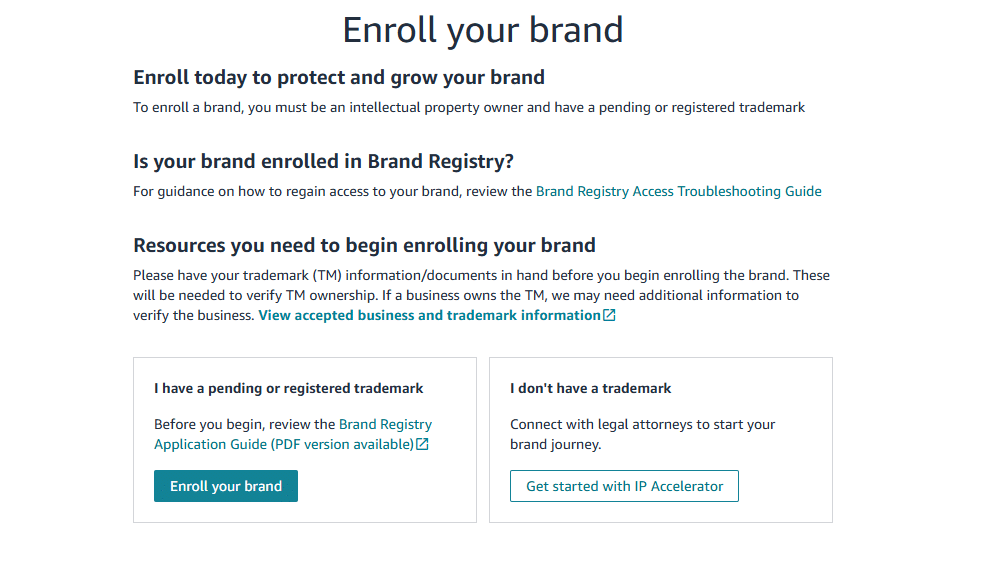
Image above: The first Brand Registry application screen asks for the exact brand name, logo, trademark office, and trademark serial or registration number.
Step 9: Add Existing ASINs, If Applicable
Amazon may ask whether the brand already has products listed on Amazon.
You can enter the ASINs for those products.
An ASIN is Amazon’s identifier for a product detail page. You can usually find it in the listing details, Seller Central, or the product-information section of the Amazon detail page.
This field may be optional.
Many brands enroll in Brand Registry before their products have been launched on Amazon. You do not necessarily need existing ASINs to complete the application.
If you do enter ASINs, make sure they genuinely belong to the brand you are enrolling.
Step 10: Add Your Website and Other Sales Channels
Amazon may ask for the brand’s website and whether the products are sold through other ecommerce platforms.
The website is often optional, but it can provide additional context showing that the brand is a real operating business.
Other platforms could include:
- The brand’s direct-to-consumer website
- Walmart Marketplace
- TikTok Shop
- Other retail or ecommerce channels
Answer accurately. Do not add unrelated websites or retailer pages that do not clearly represent your brand.
Step 11: Upload Real Product Photos
The product-photo section is one of the most common sources of trouble.
Amazon is not looking for professional ecommerce photography here. It wants evidence that a real physical product or package exists and carries the brand name.
Use ordinary, unedited photos taken with a phone or camera.
The photos should show:
- The actual physical product or packaging
- The brand name clearly attached to it
- Multiple sides or angles when appropriate
- Enough detail for the wording to be readable
- A normal physical environment rather than a digitally created background
Do not remove the background. Do not create a polished white-background listing image. Do not add the logo digitally after taking the photo.
The point is not to make the product look attractive. The point is to prove that it physically exists and is branded.
A Practical Way to Show the Photo Is Real
Occasionally, Amazon rejects photos because it believes the branding may have been digitally added or generated.
One simple technique is to include your hand in the photo or position your hand so it casts a visible shadow across the product.
That helps show that the product, branding, lighting, and shadows were present in the physical scene.
For a small product, you can hold it in your hand while taking the photo. For a larger product, place it on a table and photograph it from several angles.
The background does not need to be attractive. A normal table or workspace is fine.
The Brand Name Must Match
The wording shown on the physical product or packaging should match the trademark and the name entered in the application.
A logo that says Five Star may not adequately support an application for FIVE STAR COMMERCE.
Do not assume Amazon will infer that two similar names represent the same brand.
For more detail on this specific problem, read Amazon Brand Registry Photos Rejected: How to Fix It.
Acceptable and Risky Product Photos
| Photo Type | Recommended? | Why |
|---|---|---|
| Phone photo of the real product on a table | Yes | Clearly shows a physical product exists |
| Photo showing several sides of the product | Yes | Helps Amazon verify the branding from multiple angles |
| Photo with the product held in your hand | Yes | Helps demonstrate that the product and logo are physically present |
| Professional white-background listing image | Usually no | May not prove that the branding is physically attached |
| Photo with the background digitally removed | Risky | Can appear altered |
| Logo added in Photoshop, Canva, or an AI tool | No | Does not prove the brand is physically attached |
| Blurry photo where the brand name cannot be read | No | Amazon cannot verify the trademarked wording |
Step 12: Identify Your Relationship to the Brand
Amazon may ask whether you are:
- A seller
- A vendor
- Neither
Most businesses using Seller Central will select Seller.
If you use Vendor Central and sell products to Amazon on a wholesale basis, select Vendor.
A trademark owner that does not sell directly through either account may select Neither. For example, a brand may enroll in Brand Registry so it can monitor and protect its intellectual property while authorized distributors handle the actual Amazon sales.
Step 13: Connect the Seller Account
If you select Seller, Amazon may display seller accounts connected to the login you used.
Select the correct account.
When the application is approved, Amazon can then extend the Brand Registry benefits to that selling account.
This is why using the seller account’s owner or administrator login at the beginning is helpful.
If your seller account does not appear, use the option indicating that you do not see the account. You may still finish the application and connect the selling account after approval.
Do not select an old, closed, unrelated, or duplicate account simply because it appears in the list.
Step 14: Answer the Distribution Questions
Amazon may ask whether you sell to distributors.
Answer yes or no based on how your brand actually operates.
If you select yes, Amazon may ask:
- Whether the distributors sell on Amazon
- Which countries receive your products
- How your distribution relationships work
This information helps Amazon understand who may legitimately sell the brand.
A brand that works with authorized distributors should answer honestly. Saying that no distributors exist will not stop unauthorized sellers from appearing, and inaccurate information can make future account or authorization questions harder to explain.
Some distribution fields may be optional. Leave an optional field blank rather than guessing.
Step 15: Answer the Trademark-Licensing Question
Amazon may ask whether you license the trademark to other companies.
Most small and medium-sized brands will answer no.
Trademark licensing is more common when one company owns a famous intellectual property and allows another business to manufacture products using it.
For example, a company might receive a license to manufacture stuffed animals featuring characters owned by a large entertainment company. The manufacturer is allowed to use the intellectual property under a formal agreement and may pay royalties or a percentage of revenue.
That is different from hiring a contract manufacturer to produce your own branded goods.
Do not select yes simply because another factory manufactures the product for you.
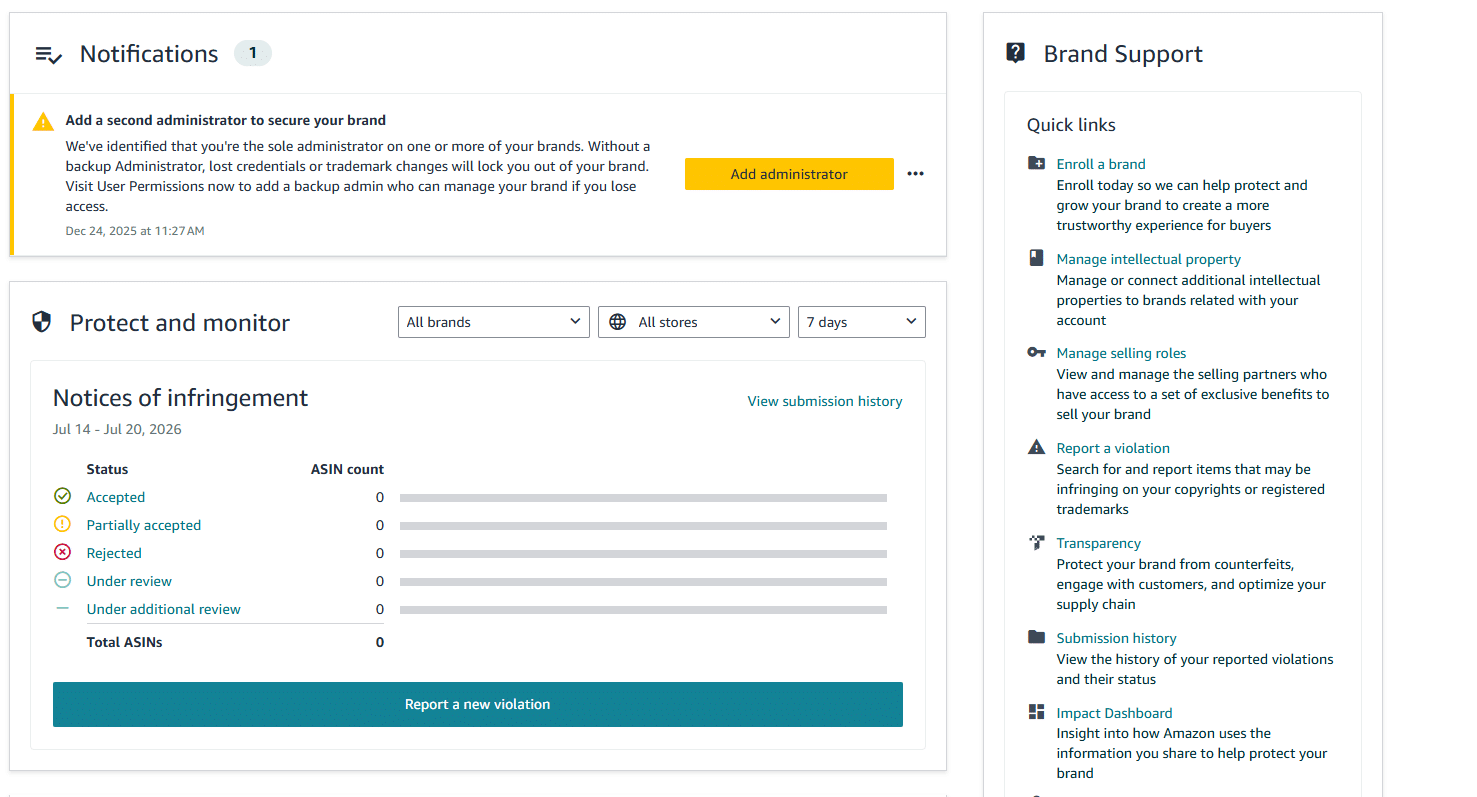
Image above: After enrollment, the Brand Registry dashboard includes brand-protection tools, infringement reporting, selling-role management, intellectual-property management, and other support options.
Step 16: Be Prepared for Additional Document Requests
Some applicants see only the basic questions. Others are asked to provide additional evidence.
Amazon’s exact requests can vary.
Supplier or Manufacturer Invoice
Amazon may request an invoice showing that your business purchased the branded products from a legitimate supplier or manufacturer.
Amazon is particular about invoices. The invoice may need to show:
- The supplier’s legal information
- Your business information
- A recent transaction date
- Relevant products and quantities
- Contact information Amazon can verify
- A completed commercial transaction rather than a quote or purchase order
Do not alter an invoice to add missing information yourself. Ask the supplier to issue a corrected document.
Use the Amazon Invoice Requirements Checklist before submitting an invoice.
Trademark Filing Receipt
A filing receipt is issued after a trademark application is submitted.
If an attorney filed the trademark, the attorney may have received the receipt and forwarded it to you. If you do not have it, ask the attorney for a copy.
Upload the original document rather than a screenshot.
Trademark Certificate
Once the trademark is fully registered, the trademark office issues a registration certificate.
The certificate typically shows the trademark wording, owner, and registration number.
Upload the original PDF when Amazon requests it.
Manufacturing Agreement
Amazon may ask whether you manufacture the products yourself or use a contract manufacturer.
If you use a contract manufacturer, Amazon may request an agreement identifying:
- Your company
- The manufacturer
- Both companies’ addresses and contact information
- The products being manufactured
- The nature of the manufacturing relationship
- Signatures from both parties
The document should show that the manufacturer is legitimately producing the branded goods for the trademark owner.
Raw-Material Invoices
A business that manufactures products in-house may not have a finished-goods invoice from an outside manufacturer.
In that situation, Amazon may accept invoices for raw materials or components used to make the products.
Those invoices still need to satisfy Amazon’s documentation requirements and clearly connect to the business applying for Brand Registry.
Possible Additional Documents
| Document | When Amazon May Request It | What It Should Show |
|---|---|---|
| Supplier or manufacturer invoice | Amazon wants proof of a legitimate supply relationship | Supplier details, applicant details, products, quantities, and transaction date |
| Trademark filing receipt | The trademark is still pending | Trademark wording, serial number, filing information, and applicant details |
| Trademark certificate | The trademark has completed registration | Trademark, registration number, owner, and official registration details |
| Manufacturing agreement | A third-party factory produces the branded products | Brand owner, manufacturer, products, relationship, and signatures |
| Raw-material invoice | The brand manufactures products in-house | Materials or components purchased by the applicant business |
Step 17: Review and Submit the Application
Review the application carefully before clicking Submit.
Application Review Checklist
| Check | Confirmed |
|---|---|
| Brand name matches the trademark exactly | ☐ |
| Capitalization, spacing, and punctuation match | ☐ |
| Correct trademark owner selected | ☐ |
| Trademark is active and eligible | ☐ |
| Correct trademark office selected | ☐ |
| Serial or registration number is accurate | ☐ |
| Logo includes the trademarked wording | ☐ |
| Product photos are real and unedited | ☐ |
| Brand name is readable on the product or packaging | ☐ |
| Correct seller account selected | ☐ |
| Distribution and licensing answers are accurate | ☐ |
| Attorney or representative is expecting Amazon’s email | ☐ |
| Supporting documents are complete original files | ☐ |
It is much easier to spend another ten minutes checking the application than to spend days or weeks diagnosing a rejection.
Step 18: Watch for the Verification-Code Email
Submitting the application is not always the final step.
If Amazon accepts the initial information, it may contact the attorney or representative listed on the official trademark record.
Amazon generally sends that person a verification code or instructions for confirming the application.
This surprises many applicants.
Amazon does not necessarily send the code directly to the person who submitted the Brand Registry application. It uses the contact information on the trademark record to verify that the applicant is authorized to enroll the brand.
Before applying, contact the attorney and let them know to watch for an Amazon message.
The attorney may need to:
- Confirm that the trademark information is correct.
- Follow any instructions Amazon includes.
- Provide the verification code to you.
Do not ask the attorney to forward the code to unauthorized parties.
Step 19: Submit the Verification Code Through the Case Log
Once you receive the code, log back into Brand Registry.
Go to the support area and open the Brand Support Case Log.
Find the case connected to the enrollment application, open it, and respond with the verification code.
Follow the wording Amazon requests. Do not add unnecessary explanations unless there is a discrepancy that needs to be addressed.
After receiving the code, Amazon may take another few business days to complete its review. The exact timing can vary.
Step 20: Confirm That Brand Registry Benefits Are Connected
After approval, Amazon may say that Brand Registry benefits will begin working within a stated period, often within the next few days.
Do not assume that every benefit is connected immediately.
If you selected your seller account during enrollment, the connection may happen automatically.
If you did not, go into Brand Registry and look for the selling-role management area. The wording may appear as Manage Selling Roles or a similar option.
From there, you may need to:
- Select Connect to Selling Account.
- Choose a seller account where you are an administrator.
- Continue through the authorization process.
- Grant Brand Registry benefits to the account.
Be careful when assigning roles. Only give access to users and seller accounts that are authorized to represent or sell the brand.
What to Do If You Do Not Have a Trademark Yet
You cannot complete Brand Registry enrollment without an eligible trademark.
You still have a few options.
Apply for Brand Name Approval First
Brand name approval may allow you to create listings using the brand name while the trademark is being filed.
This does not give you the full Brand Registry benefits, but it can let you begin creating branded listings.
File a Trademark
For a legitimate product brand planning to sell on Amazon, obtaining a trademark often makes sense.
You may not need to wait for the entire trademark-registration process to finish. Once the application reaches an eligible stage and has a usable serial number, you may be able to apply for Brand Registry.
The exact timeline depends on the trademark office, application, and any legal issues. Do not assume that every filing becomes eligible on the same schedule.
You also do not necessarily have to use Amazon’s IP Accelerator. A qualified trademark attorney outside that program may be able to file the application.
What If the Brand Name Is Not on the Product or Packaging?
Amazon generally expects the brand name to be physically attached to the product or packaging.
A brand name added only to a digital image is not enough.
If your current inventory is unbranded, the long-term solution is to update the manufacturing or packaging process so that the brand is printed, engraved, sewn, molded, labeled, or otherwise permanently applied.
For an early sample or application photo, some brands create one physically branded unit using a custom printed label or vinyl decal.
The important distinction is that the branding must be physically present in the photo. It cannot be digitally pasted onto the image afterward.
Do not use a temporary workaround to misrepresent how the production inventory will be branded. Your real products and packaging should ultimately match the brand identity used on Amazon.
See Brand Approval Without Branded Packaging for a practical example using a custom vinyl decal.
Common Amazon Brand Registry Mistakes
Entering the Brand Name With Different Capitalization
The trademark says FIVE STAR COMMERCE, but the application says Five Star Commerce.
That may look harmless to a person, but it can cause automated verification problems.
Selecting a Similar Trademark Owned by Someone Else
Trademark databases often contain several close matches.
Always check the owner, serial number, and status.
Using a Supplemental Register Trademark
For a United States application, make sure the trademark record meets Amazon’s eligibility requirements and is not relying on an ineligible registration type.
Uploading Professional Listing Images
Amazon wants real-world evidence for this part of the application.
A polished white-background image may look digitally produced and fail to prove that the branding is physically attached.
Uploading Digitally Altered Photos
Do not paste a logo onto a product photo in Photoshop, Canva, or an AI image tool.
Amazon may reject the application if the branding appears computer-generated.
Using a Logo That Does Not Show the Trademarked Wording
A graphic symbol alone may not connect clearly to a wordmark application.
Using the Wrong Amazon Login
Using an unrelated login can make it harder to connect the correct seller account after approval.
Ignoring the Trademark Attorney
The application may sit unresolved because the attorney received the verification message but did not know what it was.
Contact the attorney before submitting.
Treating a Contract Manufacturer as a Trademark Licensee
A manufacturer producing your own branded product is not automatically licensing your intellectual property.
Answer the licensing question based on the actual legal relationship.
Uploading Screenshots Instead of Original Documents
When Amazon asks for a filing receipt, trademark certificate, invoice, or agreement, upload the complete original file whenever possible.
Screenshots may cut off important information and are easier for Amazon to question.
Frequently Asked Questions
Can I apply for Amazon Brand Registry with a pending trademark?
A pending trademark may qualify once it has reached an eligible stage and has a usable serial number. Check the current trademark record and Amazon’s application options rather than assuming you must wait for final registration.
Do I need an existing Amazon listing?
Not necessarily. Existing ASINs may be optional. A brand can apply before launching its first Amazon product.
Do I need to use Amazon IP Accelerator?
Not necessarily. You may be able to file through an independent trademark attorney and apply once the trademark reaches an eligible stage.
Should Brand Registry photos have a white background?
No. For the enrollment application, normal, unedited photos are usually more useful because they show that the product and branding physically exist.
Can I add the logo to the photo digitally?
No. The brand should be physically attached to the product or packaging before the photo is taken.
Why does the capitalization have to match?
Amazon compares the application with official trademark information. Even a small difference can create a mismatch and lead to rejection.
Who receives the Brand Registry verification code?
Amazon may send it to the attorney or representative listed on the official trademark record. That person then confirms the information and gives the code to the applicant according to Amazon’s instructions.
What happens if my seller account does not appear during enrollment?
You may be able to finish the application and connect the account later through Brand Registry’s selling-role management tools.
How long does Brand Registry approval take?
Timing varies. Amazon may review the initial application, contact the trademark representative, wait for the verification code, and then complete a final review. Incorrect information or additional document requests can make the process considerably longer.
The Main Thing to Remember
Amazon Brand Registry is not difficult because the form is long. It is difficult because the information has to line up across several systems.
Your application, trademark record, logo, product photos, business information, attorney verification, and seller account all need to point to the same legitimate brand.
Most preventable rejections come from small mismatches:
- The wrong capitalization
- The wrong trademark record
- A logo that does not show the full brand name
- Product photos that look digitally altered
- A missing attorney verification code
- A seller account that was never connected
Check each part carefully before submitting. Getting it right the first time is much easier than trying to determine which small discrepancy caused Amazon to reject the application.
Once Brand Registry is approved, also review the Amazon New Seller Incentives guide. Some incentives have eligibility requirements and deadlines, so this is something to check early rather than months after launch.
If you want a walkthrough, the video above covers this step-by-step. If you’ve got a quick question, leave a comment on the video. And if your situation is more complex and you want professional help, reach out to us at customerservice@fivestarcommerce.com or schedule an info call using the “Schedule info call” button on our website.